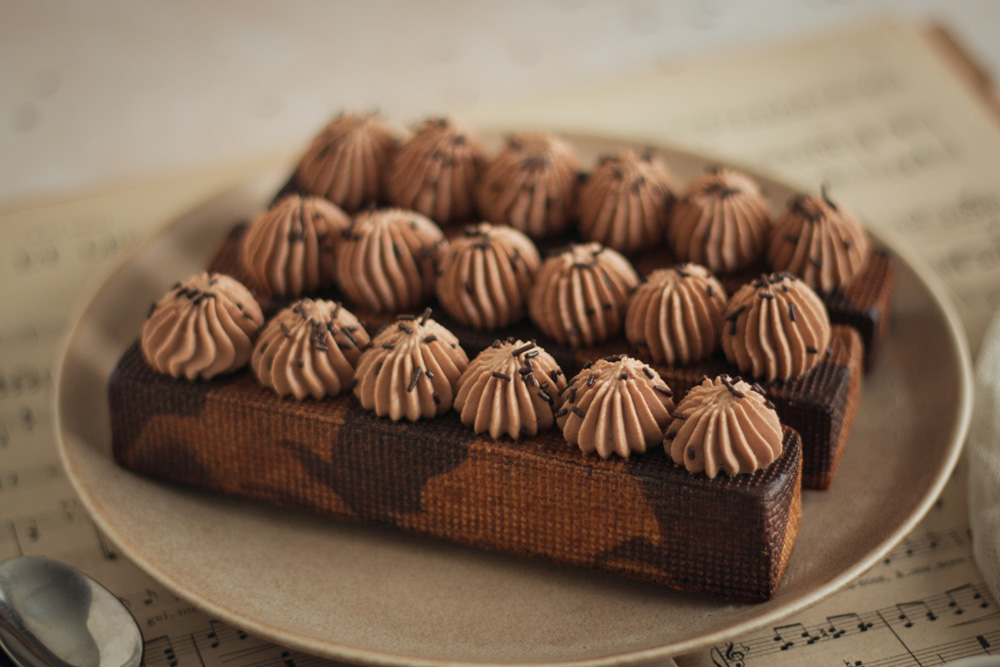
After making 100% vanilla cylindrical choux buns, calamansi and lime tube éclairs and then vanilla and hazelnut tube éclairs, here comes the guided choux baking technique once again, with these marbled vanilla and chocolate rectangular éclairs.
I wanted to reinvent the famous marble loaf cake, choux-style. Of course, when I say “reinvent”, I mean the marbled effect and the vanilla and chocolate flavours. This dessert is nothing like a loaf cake 😉
What equipment do you need to make these choux buns?
To make these rectangular éclairs, you will need rectangular frames but also Silpain mats. Careful, this is different from the silicone Silpat mat. The Silpain mat is micro-perforated, which is what gives the choux buns that grid pattern. You’ll find them everywhere, online or in shops (baking supply shops or even Zôdio). It’s then up to you to cut the mat to the right dimensions. Yes, I know… it’s heartbreaking to have to take scissors to that mat, but that’s how it is!
Finally, I recommend using a perforated baking tray. The perforations help hot air circulate under the mould or the baking sheet being used (or the mat being used). It’s perfectly suited to fan ovens or convection ovens.
How do you get the marbled effect right?
I won’t lie to you… I’m rather proud of my marbled choux buns! Firstly, because it’s something I had never seen anywhere (and for someone who is used to taking inspiration from others, I can assure you that feels good), and secondly because I managed to get exactly the effect I wanted (after many attempts, admittedly).
It was while baking a first batch of rectangular choux buns that the idea came to me. “What if I made a cocoa choux pastry and tried to make a marble?” BAM, the idea was there, all that was left was to try! At first, I piped a line of cocoa choux pastry and then, on top, a line of plain choux pastry, then cocoa if needed (I weigh every time). Then with a wooden skewer, I made marbling by quickly mixing the 2 pastries, a bit like for a loaf cake really. Unfortunately, it was a failure. The base is all cocoa, it’s barely marbled.
Second batch. I decide to pipe the 2 pastries alternately, a little plain pastry, a little cocoa, plain, cocoa and start again on top. Still with a skewer, I try to make marbling. In the end, I get a choux bun spotted like a giraffe, not what I wanted.
The next day, I decide to go about it differently and I put the plain pastry in one piping bag, the cocoa pastry in another bag, and I put these 2 bags into a third piping bag (a bit like for two-tone macarons). I pipe the pastry in a spiral and make the marbling, still with a wooden skewer. The result is frankly disappointing. It’s infuriating!
Last attempt: while piping the pastry, instead of making a sort of spiral, I rotate the piping bag on itself. This way, the 2 pastries never really end up in the same place and you lose the overly regular look of the “marbling” (of the semblance of marbling, rather). Not easy to explain all this… feel free to go and look at my highlighted stories on Instagram, you’ll find all my attempts there. In any case, this time it’s the right one! The choux bun is marbled just as I had imagined. I’m so happy to have managed it (especially since I was baking them 3 at a time with over an hour of baking, I’ll let you imagine the number of hours my oven stayed on)!
How do you bake these choux buns successfully?
The success of your choux buns will depend on several factors: your oven, the amount of pastry piped, the size of your stainless steel frames. Mine measure 16×3.2 cm and 2.5 cm high. Thanks to my mate MD’Rékréation who lent me his gear (the Debuyer frames and the Silpain strips already cut). In any case, I have only one piece of advice (or almost) to give you: write down everything you do. Weigh the choux pastry, bake, remove the frames and see whether you need to adjust next time. It may take you a few attempts before you find all the right settings 😉
If the choux bun doesn’t fit the frame perfectly, you hadn’t put in enough pastry; if it overflows, there was too much. The choux pastry can be more or less baked (it’s up to you to see, to test). Be aware that choux pastry takes longer to bake when it’s enclosed in this way.
I’ve posted several videos on guided choux baking on Instagram, don’t hesitate to go and have a look to get a better idea of the technique.

Ingredients & preparation
6 components · Full recipe
Vanilla Diplomat Cream (can be started the day before)
Ingredients
- 250 g (8.8 oz) whole milk
- 1 vanilla pod
- 60 g (2.1 oz) egg yolks (3 yolks)
- 50 g (1.8 oz) caster sugar
- 25 g (0.9 oz) cornstarch
- 25 g (0.9 oz) butter
- 4 g (0.1 oz) gelatin sheets
- 200 g (7.1 oz) whipping cream
Method
1
Rehydrate the gelatin sheets in a large bowl of cold water.
2
In a saucepan, heat the milk with the split and scraped vanilla pod and half the sugar.
3
In a bowl, whisk the egg yolks with the remaining sugar until the mixture turns pale. Add the cornstarch and mix.
4
Pour half the hot milk over the egg mixture, whisking continuously, then return everything to the saucepan.
5
Cook over medium heat, whisking constantly, until the cream thickens (about 2 minutes after it starts to boil).
6
Off the heat, add the butter and the drained gelatin. Mix well.
7
Pour into a dish, cover with cling film in contact and refrigerate until completely cold (at least 2 hours, or overnight).
8
When ready to use, whip the cold cream to a whipped cream consistency. Smooth the cold crème pâtissière with a whisk, then gently fold in the whipped cream.
9
Transfer to a piping bag fitted with a plain nozzle and set aside in the refrigerator.
Milk Chocolate Whipped Ganache (to start the day before)
Ingredients
- 100 g (3.5 oz) milk chocolate (Jivara 40% Valrhona)
- 80 g (2.8 oz) whipping cream (hot)
- 160 g (5.6 oz) very cold whipping cream
Method
1
Melt the milk chocolate in a bain-marie or microwave.
2
Heat the 80 g (2.8 oz) of cream and pour it in three additions over the melted chocolate, mixing vigorously each time to create an emulsion.
3
Add the cold cream and mix. Blend with an immersion blender to homogenise.
4
Cover with cling film in contact and refrigerate overnight (at least 6 hours).
5
When ready to use, whip the ganache like a Chantilly cream until it holds its shape. Transfer to a piping bag fitted with a plain nozzle and set aside in the refrigerator.
Plain Choux Pastry
Ingredients
- 80 g (2.8 oz) water
- 80 g (2.8 oz) whole milk
- 70 g (2.5 oz) butter
- 90 g (3.2 oz) T55 flour
- 3 g (0.1 oz) salt
- 5 g (0.2 oz) sugar
- 3 eggs (approximately 150 g (5.3 oz))
Method
1
In a saucepan, bring the water, milk, butter, salt and sugar to the boil.
2
Remove from the heat, add the flour all at once and mix vigorously with a spatula.
3
Return to the heat and dry out the dough for 1–2 minutes, stirring constantly, until it comes away from the sides of the pan and a thin film forms on the bottom.
4
Transfer to the bowl of a stand mixer fitted with the paddle attachment. Mix at medium speed for 1–2 minutes to cool slightly.
5
Add the beaten eggs one at a time, mixing well between each addition. The dough is ready when it forms a smooth ribbon that falls from the spatula.
6
Transfer to a piping bag (no nozzle needed yet — see assembly step).
Cocoa Choux Pastry
Ingredients
- 80 g (2.8 oz) water
- 80 g (2.8 oz) whole milk
- 70 g (2.5 oz) butter
- 80 g (2.8 oz) T55 flour
- 10 g (0.4 oz) unsweetened cocoa powder
- 3 g (0.1 oz) salt
- 5 g (0.2 oz) sugar
- 3 eggs (approximately 150 g (5.3 oz))
Method
1
Follow the same method as for the plain choux pastry, replacing 10 g (0.4 oz) of flour with 10 g (0.4 oz) of cocoa powder.
2
Transfer to a separate piping bag.
Baking the Rectangular Choux
Ingredients
- the plain choux pastry
- the cocoa choux pastry
Method
1
Preheat the oven to 190°C / 375°F, fan-assisted.
2
To create the marbled effect, fit a large piping bag with a wide plain nozzle (14–16 mm). Insert both piping bags of choux dough side by side into this large bag.
3
Pipe the dough into the mould compartments, filling each about three-quarters full.
4
Smooth the surface with a slightly damp fingertip or a small offset spatula.
5
Bake for 35–40 minutes without opening the oven. The choux should be well coloured and feel hollow when tapped.
6
Leave to cool completely on a wire rack before unmoulding.
Assembly
Ingredients
- the rectangular choux
- the vanilla diplomat cream
- the milk chocolate whipped ganache
- icing sugar (for dusting)
Method
1
Using a small knife, cut a thin slice off the flat base of each rectangular choux to create a stable base. Turn over: the smooth side becomes the top.
2
Make 3 small holes in the base of each choux with a plain nozzle tip or a skewer.
3
Fill each choux: pipe the diplomat cream into one hole and the milk chocolate whipped ganache into another, until the choux is well filled (you will feel resistance).
4
Place the filled choux on a serving plate, smooth side up. Dust lightly with icing sugar at the last moment.
5
Serve immediately or refrigerate until ready to serve (within a few hours for best results).
Frequently asked questions
What equipment is needed to make these choux?
You will need a rectangular choux mould (available online), a stand mixer or hand mixer, piping bags, a wide plain nozzle (14–16 mm) and a smaller plain nozzle for filling. A kitchen thermometer can also be useful.
How to achieve the marbled effect?
The trick lies in placing both piping bags (one with plain dough, one with cocoa dough) side by side inside a larger piping bag fitted with a wide nozzle. As you pipe, the two doughs come out simultaneously and create a natural marbled stripe. The more evenly you press, the more regular the stripe.
How to bake choux successfully?
The key is to not open the oven door during baking, which would cause the choux to collapse. Bake at 190°C / 375°F fan-assisted for 35–40 minutes. The choux should be well coloured and feel hollow when tapped on the base. If they are not dried out enough inside, you can open the oven slightly in the last 5 minutes by wedging a wooden spoon in the door.

Gallery