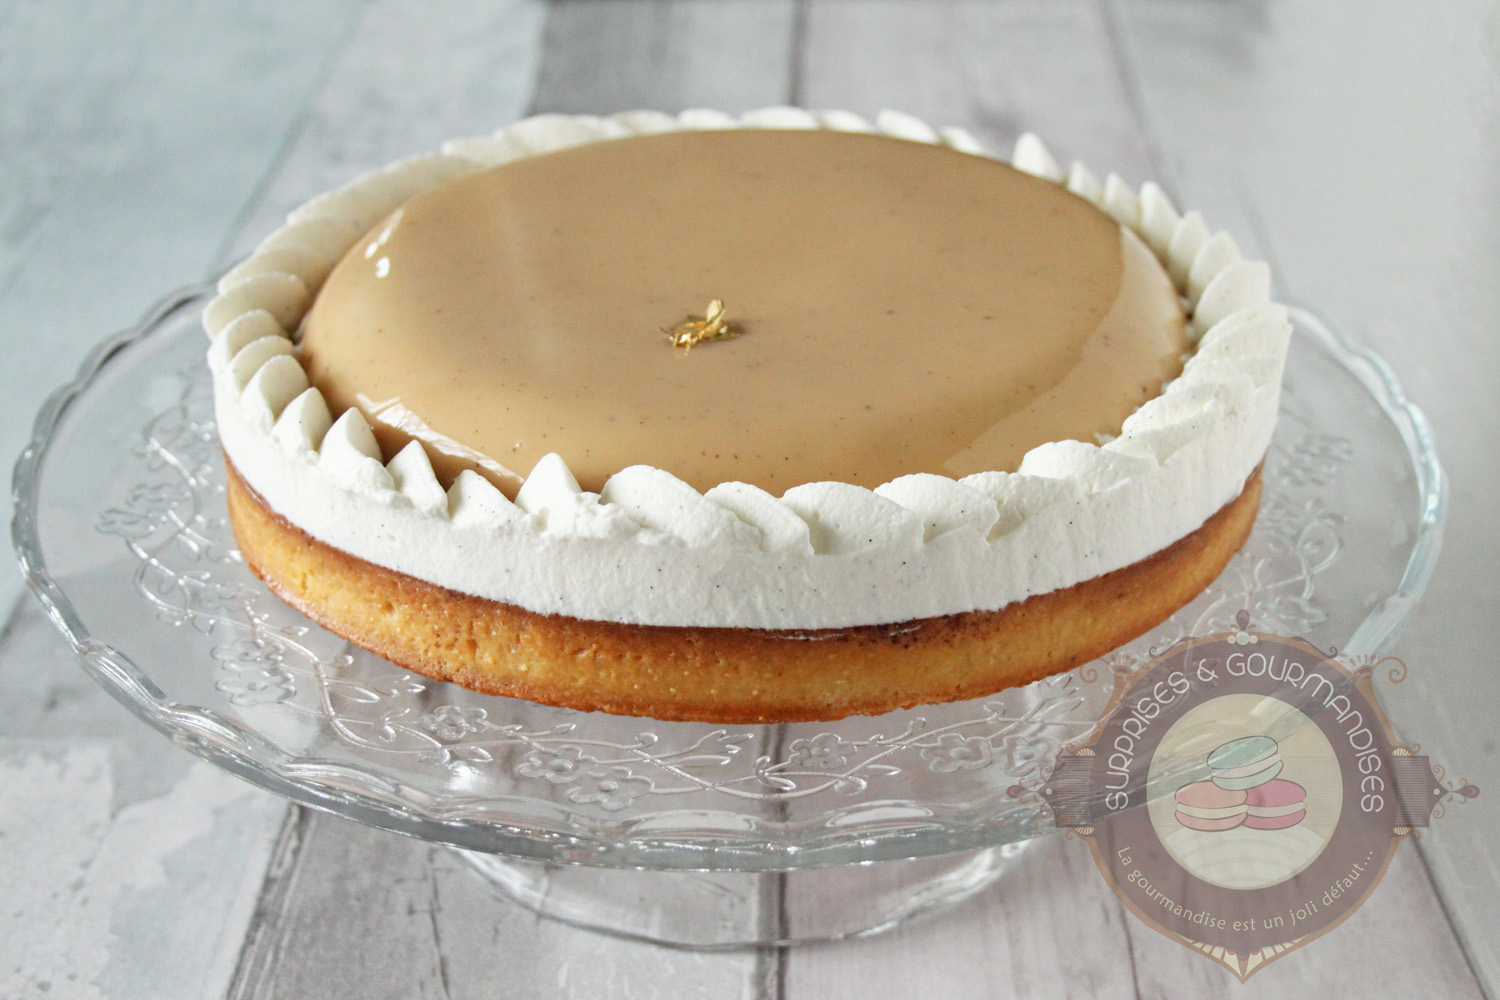
Tonight, I really hope to make your mouth water with this delicious recipe, a dessert halfway between a tart and an entremets. Apart from the Dulcey mousse, which I’d never made before (I took the recipe from the blog Lilie Bakery), I used recipes that had already been tried and tested (and that can be found on the blog).
I wanted to pair dark chocolate with Valrhona’s Dulcey blond chocolate, a real discovery! I’d been hearing about it for ages, but I had the chance to taste it for the first time at the Sugar Paris fair. A pure delight! So I got myself a bar at G Detou (if you don’t know it, go and have a look… in Paris and Lyon, a must-see!).
All the flavours went together wonderfully! It wasn’t too sweet… and everyone loved it. In short, it’s simply to die for!
Edit of 19/03/19: I’ve revised and corrected the recipe and I’m publishing new photos, much prettier than the previous ones. As for the recipe, I replaced the dark chocolate ganache with a dark chocolate crémeux, which is much smoother. I also reduced the amount of Dulcey mousse for a better balance. I took the crémeux recipe from La Pâte de Dom as well as the quantities for the praline crunchy layer.
Ingredients & preparation
8 components · Full recipe
Sweet Pastry (makes 2 × 22 cm (8.7 in) tart shells — make the day before or 2 days ahead)
Ingredients
- 150 g (5.3 oz) butter, softened
- 95 g (3.4 oz) icing sugar
- 30 g (1.1 oz) ground almonds
- 60 g (2.1 oz) egg (1 large egg)
- 250 g (8.8 oz) flour
- a pinch of fleur de sel
- a knife-tip of vanilla powder
- 1 egg yolk
- 4 g (0.1 oz) full-fat liquid cream
Preparation
1
Place the softened butter and icing sugar in the bowl of a stand mixer fitted with the paddle attachment and mix on low speed. Add the ground almonds, vanilla powder and fleur de sel and mix again.
2
Add the beaten egg and fold in with a spatula (this will be easier than using the mixer).
3
Add the flour and mix with the stand mixer until a smooth dough forms. Do not overwork the dough. Bring it together into a ball without pressing too firmly. Divide the dough into 2 equal portions.
4
Wrap each portion in cling film, shaping it into a flat rectangle. Place one portion in the fridge overnight and the other in the freezer (for another tart).
5
The next day, roll the dough out to 2–3 mm thickness with a rolling pin. Cut out a 25 cm (9.8 in) diameter circle and chill in the fridge for 15 minutes so the dough is easier to handle.
6
Grease the tart ring, then lay the pastry in it, taking care to create a neat right angle at the base. Chill for at least 6 hours (ideally).
7
Preheat the oven to 160°C / 325°F.
8
Once the pastry is well chilled, trim off any excess with a small knife.
9
Line with a sheet of baking paper and fill with baking beads or dried beans to blind-bake the pastry.
10
Bake for 30–35 minutes until nicely golden. About 10 minutes before the end of baking, you can brush the tart shell (inside and outside) with the egg yolk and cream mixture to get a glossy finish.
11
Once out of the oven, transfer the tart shell to a wire rack to cool and dust lightly with cocoa butter to waterproof the pastry — it will stay lovely and crisp.
12
Smooth out any imperfections in the pastry with a Microplane grater.
13
I have given a brief outline of the lining and blind-baking steps here, but in practice I now follow the method from La pâte de Dom, which produces very neat tart shells. The method may look a little lengthy, but the results speak for themselves. I recommend watching his video tutorial on his YouTube channel for more detail 🙂
Dulcey Vanilla Glaze (to make the day before)
Ingredients
- 150 g (5.3 oz) glucose
- 150 g (5.3 oz) sugar
- 75 ml (2.5 fl oz) water
- 150 g (5.3 oz) Dulcey blonde chocolate
- 100 g (3.5 oz) full-fat liquid cream
- 10 g (0.4 oz) powdered gelatine
- 60 g (2.1 oz) water (to rehydrate the gelatine)
- yellow food colouring
- a knife-tip of vanilla powder
Preparation
1
Ideally, make the glaze the day before (or in advance) and reheat in the microwave when ready to use.
2
Rehydrate the gelatine in the water.
3
In a saucepan, combine the water, sugar and glucose and heat to 103°C / 217°F.
4
Meanwhile, in a jug, combine the Dulcey chocolate cut into pieces, the liquid cream, the rehydrated gelatine and the vanilla powder.
5
When the water/sugar/glucose mixture reaches 103°C / 217°F, pour it into the jug and blend with a hand blender for a few minutes to smooth the glaze — take care not to incorporate air, as that will cause unsightly bubbles.
6
If needed, strain through a fine-mesh sieve, press cling film directly onto the surface and refrigerate.
Dulcey Blonde Chocolate Mousse
Ingredients
- 210 g (7.4 oz) Dulcey blonde chocolate
- 110 g (3.9 oz) milk
- 225 g (7.9 oz) full-fat liquid cream
- 5 g (0.2 oz) powdered gelatine
- 25 g (0.9 oz) water (to rehydrate the gelatine)
Preparation
1
Rehydrate the gelatine in the water.
2
In a bowl, break the chocolate into pieces and melt gently in the microwave.
3
Bring the milk to the boil, then remove from the heat and add the rehydrated gelatine.
4
Pour the milk in three additions over the melted Dulcey chocolate, stirring with a spatula to create an emulsion.
5
Whip the liquid cream to a chantilly, but do not over-whip — it should be light and mousse-like.
6
When the chocolate mixture has cooled to 20°C / 68°F, gently fold in the whipped cream and set aside.
7
Pour the Dulcey mousse into the bottom section of an Eclipse mould (filling to the edge) and freeze overnight.
Praline Crunch (to make the day before)
Ingredients
- 15 g (0.5 oz) milk chocolate
- 60 g (2.1 oz) almond-hazelnut praline
- 30 g (1.1 oz) gavottes (feuilletine)
Preparation
1
Melt the milk chocolate and add the praline. Mix together.
2
Add the crumbled gavottes.
3
Spread the praline crunch between 2 sheets of baking paper to form a 20 cm (7.9 in) diameter disc. The crunch layer will be intentionally very thin.
4
Refrigerate for 30 minutes.
5
Peel back the first sheet of baking paper and reposition it. Turn the disc over and repeat. This releases the praline crunch from both sheets of baking paper.
6
Use a 20 cm (7.9 in) ring cutter to cut out the disc. Replace the baking paper and freeze until the next day.
7
I usually cut out the crunch disc before freezing. Here the crunch is very thin, so I think it would also be perfectly fine to cut out the circle after freezing.
Moist Chocolate Sponge
Ingredients
- 62 g (2.2 oz) eggs
- 20 g (0.7 oz) honey
- 30 g (1.1 oz) sugar
- 20 g (0.7 oz) ground almonds
- 30 g (1.1 oz) flour
- 2 g (0.1 oz) baking powder
- 30 g (1.1 oz) full-fat liquid cream
- 25 g (0.9 oz) grape-seed oil
- 25 g (0.9 oz) 70% dark chocolate
- a little rum (optional)
Preparation
1
Preheat the oven to 170°C / 340°F.
2
Melt the chocolate and oil together in the microwave, then stir with a spatula.
3
Place all the remaining ingredients in a food processor, then add the chocolate and oil mixture. Process for about one minute.
4
Pour the batter into a 22 cm (8.7 in) diameter ring.
5
Bake for approximately 15 minutes, until the sponge is fully cooked through. Transfer to a wire rack.
6
One advantage of this sponge is that it stays beautifully moist even when chilled, because it contains oil rather than butter, which sets firm in the fridge.
Dark Chocolate Cremeux
Ingredients
- 72 g (2.5 oz) whole milk
- 145 g (5.1 oz) full-fat liquid cream
- 20 g (0.7 oz) glucose syrup
- 26 g (0.9 oz) egg yolks
- 112 g (4 oz) dark chocolate
Preparation
1
Melt the dark chocolate and set aside.
2
Warm the glucose syrup briefly in the microwave so it becomes liquid and easier to work with.
3
Place the egg yolks in a bowl, add the glucose and whisk together.
4
In a saucepan, heat the milk and cream together and bring to the boil.
5
Remove from the heat, add the egg yolk and glucose mixture, then return to the heat and cook, stirring constantly, until the temperature reaches 82°C / 180°F — just like making an anglaise.
6
Pour the contents of the saucepan over the melted chocolate and stir with a whisk.
7
Blend with a hand blender until the cremeux is perfectly smooth and glossy.
8
Transfer to a piping bag without a nozzle and set aside at room temperature until assembly.
Vanilla and Tonka Bean Chantilly
Ingredients
- 100 g (3.5 oz) full-fat liquid cream
- 10 g (0.4 oz) mascarpone
- 1 tablespoon icing sugar
- ¼ tonka bean
- ¼ vanilla pod
Preparation
1
Place the bowl and whisk attachment of your electric mixer in the freezer for at least 15 minutes.
2
Pour the liquid cream and mascarpone into the chilled bowl and begin whisking at medium speed. As the cream starts to stiffen slightly, increase the speed. Gradually the cream will thicken and hold its shape.
3
Check the consistency from time to time by stopping the mixer: the cream is ready when it holds completely. If you turn the bowl upside down, it should not move. Be careful not to over-whip — you risk a greasy texture in the mouth. Knowing when to stop is key.
4
Don’t forget to add the icing sugar, vanilla seeds and finely grated tonka bean once the cream is almost whipped.
5
Transfer to a piping bag fitted with a small Saint-Honoré nozzle and refrigerate until assembly.
Assembly
Ingredients
- None
Preparation
1
Use an 18 cm (7.1 in) ring cutter to cut the moist chocolate sponge into a disc (the offcuts are delicious!).
2
Pipe a small spiral of dark chocolate cremeux onto the tart base, then place the sponge disc precisely in the centre. Press gently to adhere.
3
Pipe the remaining dark chocolate cremeux around the edges (there was about 5 mm of space between the sponge and the tart edge). Cover the chocolate sponge disc too, then smooth the cremeux level with an offset spatula.
4
Place the frozen praline crunch on top of the tart, carefully centering it.
5
Remove the Dulcey mousse from the freezer. Unmould from the silicone mould and place the mousse disc on a wire rack set over a plate or dish to catch the excess glaze.
6
If the glaze was made in advance, warm it to approximately 30°C / 86°F, then gently pour it over the mousse disc to coat completely. Leave to drain and tap the rack to let the excess run off.
7
Using a large offset spatula, carefully lift the glazed Dulcey mousse disc and place it precisely on top of the praline crunch.
8
Pipe the chantilly all around the edge of the entremet.
9
I then ran a spatula all around the tart to give it a smooth finish — looking back, I regret it. I think it looked prettier before 😉

Gallery