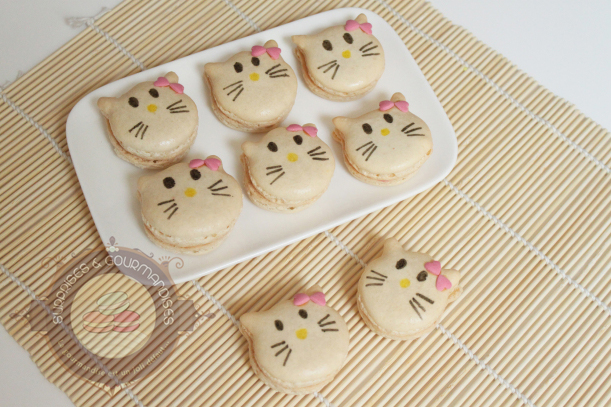
Here is one of the macaron recipes I made for my niece’s 2nd birthday. I wanted to make more fun, more playful macarons, and I started with some Hello Kitty ones. I’d been thinking about it for a long time, as I’d ordered some edible-ink pens (black and yellow) online thanks to a competition I’d entered. Aren’t they just adorable? The ears aren’t easy to make — the weather was dry and the macarons took very little time to form a skin — but I saw it through to the end.
The longest step was then drawing the face and sticking on the little sugar hearts to make the bow. I stuck them on with liquid caramel. Only one small downside: next time, I’ll draw the face a little lower, as the bows were really too close to the eyes. Oh well, it’s only a detail 😉
Ingredients & preparation
3 components · Full recipe
Shells
Ingredients
- 70 g (2.5 oz) egg whites
- 140 g (4.9 oz) icing sugar
- 80 g (2.8 oz) ground almonds
- 20 g (0.7 oz) caster sugar
Preparation
1
Blend the icing sugar and ground almonds together, then sift the mixture.
2
Beat the egg whites to stiff peaks, add the caster sugar in 2 additions and whisk at maximum speed to achieve the “bird’s beak” stage.
3
Gradually fold in the almond and icing sugar mixture using a rubber spatula. The mixture should be glossy, smooth and fall in a ribbon. Once the right consistency is achieved, transfer to a piping bag fitted with a plain nozzle. Don’t hesitate to use a tall glass to support your piping bag — this way you can use both hands.
4
Pipe small domes of about 3.5 cm (1.4 in) in a staggered pattern on a sheet of parchment paper. Using a toothpick, draw Hello Kitty ears by pulling the batter slightly outward. For even macarons, I use a template I made myself (click here to access all the templates). Leave to form a crust for about 20 minutes. If after an hour the surface of your macarons is still not dry, there’s a good chance they won’t form a crust at all. There can be several reasons for this — in any case, there’s no point waiting any longer. Bake the macarons anyway, but be prepared for the fact that they probably won’t have a foot.
5
Bake at 120°C / 250°F for 20–22 minutes. Once out of the oven, leave to cool before removing the shells. The shells are baked when they can be removed very easily.
Step by step
Not quite comfortable with macaron shells yet? I’ve put together two full step-by-step picture guides to help you get it right every time:
Whipped Raspberry Ganache
Ingredients
- 100 g (3.5 oz) white baking chocolate
- 35 g (1.2 oz) liquid cream (30% fat) + 100 g (3.5 oz) very cold liquid cream
- 100 g (3.5 oz) raspberry coulis
- 1 tsp neutral honey
Preparation
1
In a small saucepan, heat the liquid cream with the raspberry coulis. Stir to combine and bring to the boil.
2
While the cream heats, break the white chocolate into pieces in a bowl.
3
As soon as the cream simmers, pour it over the chocolate and cover for 2 minutes. Stir to melt the chocolate and obtain a smooth, homogeneous mixture.
4
Add the 100 g (3.5 oz) of very cold liquid cream, stir and cover with cling film pressed directly onto the surface.
5
Refrigerate for at least 2 hours (or better, a whole night). If you’re in a hurry, 30 minutes to 1 hour in the freezer can do the trick.
6
The next day (or a few hours later), place the electric mixer beaters in the freezer for about 15 minutes.
7
Remove the ganache from the fridge and whip it like a chantilly cream. You should obtain a thicker, creamier whipped ganache.
Assembly
Ingredients
- sugar hearts
- food-safe pens (black and yellow)
Preparation
1
Sort your macarons so that the ones you pair together are the same size.
2
Place a small amount of whipped raspberry ganache in the centre of one macaron shell and sandwich two shells together.
3
Draw the Hello Kitty face on half the shells. To do this: stick 2 pink sugar bows with caramel (for example); draw the eyes and whiskers in black; draw the nose in yellow.
4
Refrigerate and wait 24 to 48 hours before eating. The macarons should spend the first night in an unsealed container (to prevent them from becoming moist), then close the box and keep them in the fridge for a further 24 hours. They’ll only be better for it. Find all the tips and tricks in my previous article: macaron shells (step by step in pictures).

Gallery