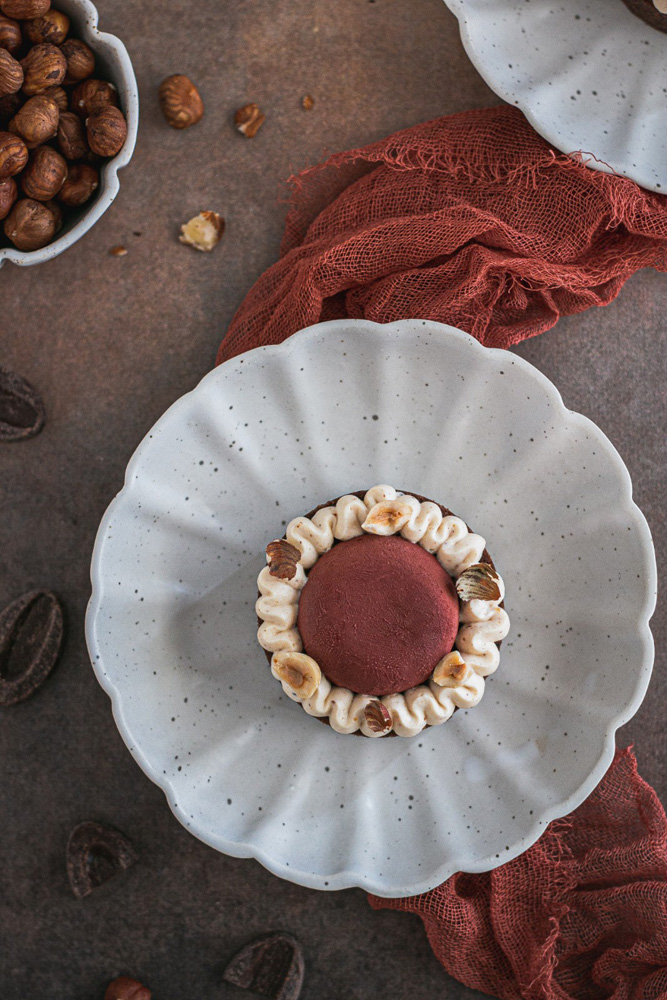
You’ve probably noticed that the blog has been running a little slowly since the start of the school year. This year, I’ve gone back to school full-time, so it’s a whole new routine to find, between work, the kids, after-school activities, baking, food photography and the blog… I’m trying to keep up a rhythm of posting on Instagram but I’ve somewhat neglected the blog, I have to admit (it’s hard to be everywhere, as you can imagine). But here I am again with a new, ultra-indulgent recipe: chocolate and hazelnut praline tartlets to die for.
It’s a recipe that calls for several different preparations, but you can spread them over several days (the hazelnut praline can be made several days or even weeks in advance, the chocolate crémeux needs to be frozen so it can also be prepared several days in advance, the whipped ganache and the pâte sucrée are prepared the day before). On the day itself, all that’s left is to bake the pâte sucrée and make the chocolate ganache (plus assembly and finishing touches of course), but that’s immediately much more manageable.
To make these delicious chocolate and hazelnut praline tartlets, I used the Globe mould by Silikomart (it’s the mould that can be used as an insert for the Stone mould). If you don’t have this mould, don’t worry, it’s perfectly possible to make this dessert anyway. You just need to find a similar mould, it could be a half-sphere mould (in that case, I advise you not to fill the cavities right to the top). You could even imagine not using a mould at all. In that case, leave the crémeux in the fridge so that it takes on a firmer texture, and simply pipe a nice ball of crémeux in the centre of the tartlet.
How do you make a hazelnut praline?
I have a preference for 100% hazelnut praline (my guilty pleasure) but you can very well make an almond/hazelnut praline. Either way, to make a good praline, you absolutely must roast the nuts, i.e. put them in the oven at about 150°C for 10 to 15 minutes (some people push the roasting a bit further, it’s up to you). This is very important because it’s what allows the nuts to release their aromas and gives them a more pronounced flavour. There are 2 methods for making a praline:
- Method 1: make a dry caramel, spread it on a tray and leave it to cool. Then simply put the cooled nuts and the sheet of caramel broken into small pieces into a food processor and blend.
- Method 2: make a syrup with water, sugar and glucose, bring it to 118°C, add the nuts and leave to caramelise (the nuts will first turn sandy, then you continue caramelising until you get a lovely caramel colour). Transfer to a tray, leave the sheet of nuts to cool completely, then blend in a food processor.
Personally, I prefer the second method. Admittedly, it takes a bit longer, but I find the result is better. Here, I used the first method because I was a little short on time (to get a better result, in this particular case, I push the roasting a bit further because the nuts don’t go back on the heat as with the second method).
Don’t hesitate to make extra praline, it keeps for months in an airtight jar at room temperature (you can also keep it in the fridge if you prefer). It will come in handy for making lots of different recipes.

Ingredients & preparation
7 components · Full recipe
Hazelnut Praline (can be made ahead)
Ingredients
- 180 g (6.3 oz) Pariani hazelnuts
- 120 g (4.2 oz) sugar
- 1 pinch of fleur de sel
Preparation
1
Toast the hazelnuts in the oven for approximately 15 minutes at 150°C / 300°F. When the hazelnuts are warm or cool, rub them between your hands to remove the skins (a little remaining skin is fine).
2
Spread the hazelnuts on a sheet of baking paper and set aside.
3
Make a dry caramel by adding the sugar gradually to the saucepan, which allows it to melt evenly. Grip the handle of the saucepan firmly and swirl the caramel in all directions without ever stirring it.
4
When everything is completely cold, break up the nut brittle and place it in a food processor with the fleur de sel. Blend until smooth and set aside in an airtight jar.
5
When the caramel is golden, remove from the heat and pour over the hazelnuts. Leave to cool completely.
6
A dry caramel needs to be swirled constantly, as it is less uniform than a sugar-water mixture. On the other hand, it burns less quickly. To make a successful caramel, never break this rule: never use any utensil to stir it! Using your wrist, while holding the saucepan firmly, you must keep swirling it non-stop, back and forth, in all directions. (source: l’Académie du goût )
Chocolate Crémeux (make the day before)
Ingredients
- 22 g (0.8 oz) egg yolks
- 6 g (0.2 oz) sugar
- 150 g (5.3 oz) heavy cream
- 60 g (2.1 oz) Valrhona Caraïbe 66% dark chocolate
- 1.25 g (0 oz) powdered gelatine
- 7 g (0.2 oz) water (to rehydrate the gelatine)
Preparation
1
Rehydrate the gelatine in the water.
2
Melt the chocolate in the microwave and set aside.
3
In a bowl, whisk the egg yolks with the sugar.
4
In a saucepan, heat the cream and bring to a gentle boil.
5
Pour the hot cream over the egg yolk/sugar mixture then return everything to the saucepan.
6
Heat to 82°C / 180°F, stirring continuously. The cream will thicken. Just as with cooking a crème anglaise, take care not to exceed this temperature. If you do not have a thermometer, here is chef Michalak’s tip: whisk the mixture quickly then stop. If the swirl stops abruptly, the cream is at the right temperature.
7
Off the heat, add the rehydrated gelatine.
8
Pour the cream over the melted chocolate in 3 additions and emulsify. Blend with an immersion blender to homogenise the crémeux.
9
Pour into each cavity of the Globe mold, cover with plastic wrap and place in the freezer overnight.
Hazelnut Whipped Ganache (start the day before)
Ingredients
- 63 g (2.2 oz) Valrhona Ivoire 35% white chocolate
- 80 g (2.8 oz) heavy cream
- 170 g (6 oz) very cold heavy cream
- 40 g (1.4 oz) hazelnut praline
- 2 g (0.1 oz) powdered gelatine (= 1 sheet)
- 12 g (0.4 oz) water (to rehydrate the gelatine)
Preparation
1
Rehydrate the gelatine in the water.
2
Break the white chocolate into pieces in a bowl (you can melt it slightly in a double boiler or in the microwave).
3
Heat the 80 g (2.8 oz) of cream and bring to a boil.
4
Off the heat, add the rehydrated gelatine and mix.
5
Pour one third of the cream over the white chocolate and stir with a spatula to create an emulsion. Then pour in a second third, then a third, until the mixture is perfectly smooth.
6
Add the 170 g (6 oz) of very cold cream and the hazelnut praline , mix again. Blend for a few seconds with an immersion blender to thoroughly emulsify everything.
7
Cover with plastic wrap directly on the surface and refrigerate overnight.
Cocoa Sablé Pastry (make the day before)
Ingredients
- 155 g (5.5 oz) plain flour (T55)
- 65 g (2.3 oz) icing sugar
- 20 g (0.7 oz) ground almonds
- 15 g (0.5 oz) cocoa powder
- 1 g (0 oz) fleur de sel
- 100 g (3.5 oz) cold butter
- 50 g (1.8 oz) egg (1 egg)
Preparation
1
In the bowl of a stand mixer, combine all the dry ingredients (flour, cocoa powder, icing sugar, fleur de sel and ground almonds).
2
Add the cold (but pliable) butter cut into small pieces and mix using the paddle attachment or by hand (with your fingertips) until the mixture resembles cocoa breadcrumbs.
3
Add the beaten egg and mix quickly. Do not overwork the dough. Bring it together into a ball without over-handling.
4
Wrap the dough in plastic wrap, shaping it into a flat rectangle. Refrigerate for at least one hour.
5
Roll the dough out to 2-3 mm thick with a rolling pin. Cut strips of dough 22 cm (8.7 in) long and 2 cm (0.8 in) wide. If the dough is too soft, do not hesitate to place it in the freezer for 5 minutes.
6
Line 7 cm (2.8 in) greased rings starting with the pastry strips (placed around the inner edges of your tartlet rings). Then cut a disc for each ring to form the base. Refrigerate for at least 6 hours (I do this the day before). You can of course line your tartlets in the traditional way by cutting a circle larger than your molds.
Baking the Cocoa Sablé Pastry
Ingredients
- None
Preparation
1
Preheat the oven to 170°C / 340°F.
2
Once the pastry is well chilled, trim any excess pastry with a small knife.
3
Place a sheet of baking paper on the tart shells and top with baking beans or dried pulses to blind bake ( normally, if the tart shells have rested overnight in the fridge, baking beans are not necessary as the pastry will not shrink ).
4
Bake for approximately 15 to 20 minutes then remove the tartlets from the oven, remove the rings and leave to cool on a wire rack (note: it is harder to judge the colour of cocoa pastry during baking).
5
If needed, smooth any imperfections in the pastry with a microplane grater.
6
Fill the tartlet shells with a layer of praline then set aside in the freezer. Ideally, the praline should be fully set before pouring the chocolate ganache so that the two layers do not mix.
Chocolate Ganache
Ingredients
- 100 g (3.5 oz) Valrhona Caraïbe 66% dark chocolate
- 50 g (1.8 oz) Valrhona Jivara 35% milk chocolate
- 125 g (4.4 oz) heavy cream
- 25 g (0.9 oz) honey
- 1/4 vanilla pod
- 0.5 g (0 oz) fleur de sel
- 40 g (1.4 oz) butter
- 7 g (0.2 oz) whole milk
Preparation
1
When the ganache has cooled to approximately 40°C / 104°F, gradually incorporate the butter pieces and emulsify again until the ganache is smooth, taking care not to incorporate any air bubbles.
2
In a small saucepan, heat the cream with the vanilla seeds. Add the salt, milk and honey.
3
Meanwhile, break the chocolate into pieces in a tall container ( I use a jug ).
4
When the liquid reaches 75°C / 167°F, pour over the chocolate. Blend with an immersion blender until perfectly smooth. When the ganache has cooled to approximately 40°C / 104°F, gradually incorporate the butter pieces and emulsify again until the ganache is smooth, taking care not to incorporate any air bubbles. Pour the ganache into each tartlet shell to the brim and place in the freezer for 1 hour until the ganache sets.
Chocolate Velvet
Ingredients
- 140 g (4.9 oz) Valrhona Caraïbe 66% dark chocolate
- 60 g (2.1 oz) cocoa butter
Preparation
1
Melt the dark chocolate and cocoa butter in a double boiler or in the microwave. Stir with a spatula.
2
Strain then pour the mixture into the reservoir of your spray gun (ideally using a smaller container like a jam jar placed inside the main reservoir).
3
Remove the small domes from the freezer, unmold them carefully and place on a wire rack. Do not forget to protect your work area well. Personally, I stopped spraying inside my dishwasher as it still left traces after washing. And since we have a new dishwasher, I want to take care of it. I use whatever I have to hand to protect the work surface (cardboard, packaging, a plastic bag or baking paper…) Spray the velvet effect from a distance of 30-40 cm (15.7 in) then place the dome in the centre of the tartlet (the ganache must be fully set).
4
Whip the hazelnut ganache with a mixer until it is firm enough to pipe but not overwhipped to the point of splitting. Transfer to a piping bag fitted with a small Saint-Honoré tip.
5
Pipe the ganache in a zigzag all around the tartlet then decorate with a few hazelnut halves and hazelnut skins.
6
Leave to defrost for 2 to 3 hours in the refrigerator before serving.

Gallery