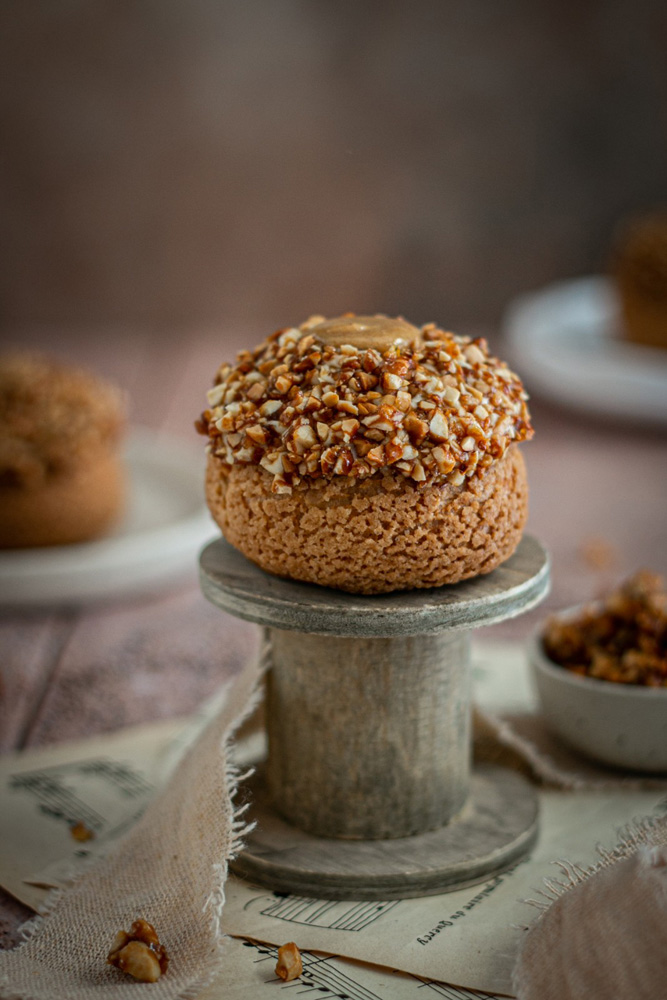
In early March, I discovered on Instagram the existence of the Bogato competition, which was just launching its second edition. After a competition devoted to cookies last year, this year the contestants would compete on the theme of little choux buns. A theme I’m particularly fond of, as you can imagine 😉 So I had to think up a choux recipe that could be made in a very short time. 80 minutes to make somewhat elaborate choux buns is no easy task!
I therefore dropped the idea of a whipped ganache, too afraid that I wouldn’t manage to get it to set in so little time. Diplomat cream is a cream I adore, especially when it’s flavoured with vanilla. And to avoid falling into the classic hazelnut choux bun (which I love), I set about making a peanut choux bun.
And there you have it! My vanilla and peanut choux buns are filled with a vanilla diplomat cream and a peanut praline insert, and they’re coated with caramelised peanuts. Delicious!
It was while watching a video by Jeffrey Cagnes on Instagram that I got the idea of coating the choux bun this way. He decorated his choux bun with sesame seeds by “dipping” it directly into the seeds (something I would never have dared to do if I hadn’t seen the video). I thought the idea was brilliant!
How do you make peanut praline?
If you’ve already made classic praline (almond and hazelnut), making peanut praline shouldn’t be a problem. The process is the same; only the nuts change. In fact, you can very well make a praline with the nuts of your choice: almond, hazelnut, pecan, pistachio, pine nut… in short, the choice is vast!
Whatever nuts you choose, you need to roast them, i.e. put them in the oven at around 150°C for 10 to 15 minutes (some people push the roasting a little further, it’s up to you). This is very important because it’s what allows the nuts to release their aromas and gives them a more pronounced flavour (and if you ever want to make hazelnut praline, it also makes it easy to remove the skins from the nuts). There are 2 methods for making praline:
- Method 1: make a dry caramel, spread it on a baking tray and leave it to cool. Then simply put the cooled nuts and the sheet of caramel broken into small pieces in a food processor and blend.
- Method 2: make a syrup with water, sugar and glucose, bring it all to 118°C, add the nuts and leave to caramelise (the nuts will first crystallise, then you continue caramelising until you get a lovely caramel colour). Tip it out, leave the tray of nuts to cool completely, then blend in a food processor.
Personally, I prefer the second method. Admittedly, it takes a little longer, but I find the result is better. So that’s the method I used to make my peanut praline. For a few months now, I’ve been using my Magimix Cook Expert to blend my nuts and get a perfectly smooth praline in no time! It’s brilliant!! But rest assured, before that I used a small food processor and it worked very well too (and yet it’s a Lidl-brand machine that cost me 16e, so no need to invest to make praline).
Don’t hesitate to make extra praline; it keeps for months in an airtight jar at room temperature (you can also keep it in the fridge if you prefer). It will come in handy for lots of different recipes 🙂
How do you make caramelised peanuts?
Here’s something very simple to do but frankly tedious, it takes a bit of time… With a food processor, the result is honestly not ideal even though it’s quicker: you quickly get a powder with larger pieces of peanut, whereas I wanted small peanut chips. So I took a chopping board and a large knife and chopped the peanuts every which way. I then used a sieve to get rid of the powder. And I started again to get even smaller peanut chips. Yes, it takes a while…
To caramelise the peanuts, I ran into a few problems. I tried several methods and the one I’m keeping is caramelising with icing sugar, which allowed me to get peanut chips that were nicely caramelised, individually. However, don’t make the same mistake as me, namely leaving your caramelised peanuts out in the open air… store them in an airtight box. Mine absorbed moisture and it’s impossible to fix afterwards (even by putting them back in the oven for a bit). I ended up redoing caramelised peanuts just before leaving for the competition and frankly, it doesn’t take 5 minutes to do, argh!!!
Finally, if you’re a fan of peanuts in pastry, I recommend you have a look on my blog for other recipes (there’s a loaf cake recipe that’s fairly simple to make, but also entremets).

Ingredients & method
6 components · Full recipe
Peanut praline (make ahead, you will have some left over)
Ingredients
- 300 g (10.6 oz) peanuts
- 200 g (7.1 oz) caster sugar
- 50 g (1.8 oz) water
- 1 pinch of fleur de sel
- vanilla
Method
1
Toast the peanuts in the oven for 10 minutes at 150°C / 300°F (take the opportunity to toast the peanuts that will be used for the final decoration).
2
Bring the water and sugar to the boil. At 118°C / 244°F, remove from the heat and pour the peanuts into the sugar syrup. Stir until the mixture turns whitish. Return to a medium heat and stir until the sugar melts again and caramelises (this may take a little time).
3
Spread onto baking paper and leave to cool.
4
Add the fleur de sel and vanilla and blend in a food processor to a praline consistency.
5
Set aside in an airtight jar. You can use vanilla in whatever form you prefer: the seeds from half a vanilla pod, vanilla powder, or even vanilla paste (which is what I used).
Caramelised peanuts (can be made ahead)
Ingredients
- 150 g (5.3 oz) peanuts
- icing sugar
- 1 teaspoon cocoa butter (or regular butter)
- 1 pinch of fleur de sel
Method
1
Toast the peanuts in the oven for 10 minutes at 150°C / 300°F.
2
Chop the peanuts into small pieces using a large knife to obtain small peanut shards.
3
Heat the peanuts in a large frying pan and dust with icing sugar to coat them completely. Leave to caramelise, stirring regularly, until they take on a nice colour.
4
Once golden, add the cocoa butter (or regular butter) and the fleur de sel and mix well. Turn out onto a surface lined with baking paper.
5
Leave to cool, separate them from each other if necessary, and store in a dry, airtight box.
Vanilla diplomat cream (can be started the day before)
Ingredients
- 420 g (14.8 oz) whole milk
- 2 vanilla pods
- 80 g (2.8 oz) caster sugar
- 80 g (2.8 oz) egg yolks (approximately 4 yolks)
- 40 g (1.4 oz) cornflour
- 4 g (0.1 oz) gelatine (= 2 sheets)
- 30 g (1.1 oz) unsalted butter
- 150 g (5.3 oz) whipping cream
Method
1
Soak the gelatine sheets in very cold water for 10 minutes.
2
In a bowl, whisk together the egg yolks and sugar until the mixture turns pale.
3
Add the cornflour and mix.
4
Bring the milk to the boil with the vanilla seeds and pod in a large saucepan. Pour three-quarters of the milk into the bowl in a steady stream, whisking constantly, then pour everything back into the saucepan containing the remaining hot milk.
5
Whisk over a medium heat until the cream thickens, for about 2–3 minutes.
6
Off the heat, add the squeezed-out gelatine then the cold butter cut into pieces and mix well.
7
Pour into a wide dish, cover with cling film pressed directly onto the surface, and leave to cool in the fridge for at least 1 hour (you can even do this step the day before).
8
The next day (or 1 hour later), put the crème pâtissière in the bowl of the stand mixer and whisk at full speed for 2–3 minutes to lighten it.
9
Whip the cream to a soft chantilly and fold it into the crème pâtissière in 3 additions.
10
Place three-quarters of the diplomat cream in a piping bag fitted with a small star nozzle. Put the remaining quarter in another piping bag fitted with a 14–16 mm round nozzle. Set aside in the fridge while you prepare the assembly.
Craquelin
Ingredients
- 30 g (1.1 oz) unsalted butter
- 37 g (1.3 oz) light brown sugar
- 37 g (1.3 oz) plain flour
- 1 pinch of fleur de sel
Method
1
In a bowl, mix together the flour, brown sugar and fleur de sel, then add the softened butter and knead for a few minutes until you obtain a smooth dough.
2
Roll the dough out to a maximum of 2 mm thickness between 2 sheets of baking paper.
3
Cut out 5 cm (2 in) diameter discs using a round cutter and set aside in the freezer. Don’t hesitate to re-use the craquelin offcuts to make more discs. Simply re-roll the dough and repeat.
Choux pastry
Ingredients
- 50 g (1.8 oz) water
- 50 g (1.8 oz) whole milk
- 2 g (0.1 oz) sugar
- 1 g (0 oz) salt
- 40 g (1.4 oz) butter
- 60 g (2.1 oz) plain flour
- 100 g (3.5 oz) eggs
Method
1
In a saucepan, combine the water, milk, salt, sugar and butter. Bring to the boil then, off the heat, add the flour all at once. Mix well with a wooden spoon.
2
Return to the heat for 30 seconds to dry out the panade (it should very slightly catch on the bottom of the pan).
3
Remove from the heat and transfer to a bowl. Leave to cool for a few minutes.
4
Whisk the eggs then add them gradually to the dough. It should be neither too thick nor too runny, and should form a ribbon (if using an electric hand mixer, use the dough hooks rather than the whisks; if using a stand mixer, use the paddle attachment).
5
Transfer the dough to a piping bag fitted with a 10 mm plain nozzle.
6
Preheat the oven to 240°C / 465°F.
7
Pipe 4 cm (1.6 in) diameter choux onto a baking sheet lined with baking paper or a silicone mat (hold the bag straight up). With this quantity of dough, I was able to make about fifteen choux.
8
Place a frozen craquelin disc on top of each choux.
9
Before placing in the oven, reduce the temperature to 175°C / 350°F and bake for about 20–25 minutes.
10
After baking, transfer the choux to a wire rack and leave to cool. To pipe choux of a consistent size, you have 2 options: use a round cutter of the right size, dip it in flour and press it onto the baking mat to mark the outline. You can also use a template that you slip underneath the baking paper (which is what I do).
Assembly
Ingredients
- None
Method
1
Place the caramelised peanuts in a bowl.
2
Pierce the base of each choux with a knife.
3
Half-fill all the choux with vanilla diplomat cream using the bag with the small star nozzle, then add a little peanut praline and finish with more vanilla diplomat cream until completely full.
4
Pipe a generous ball of vanilla diplomat cream on top using the other piping bag.
5
Hold the choux in your hand and turn it upside down to “dip” it into the caramelised peanuts, coating the cream ball well. Turn it the right way up again and neaten if necessary for a nice finish.
6
Pipe a small dot of peanut praline in the centre of the choux and refrigerate until ready to serve. As caramel is not particularly fond of fridge humidity, if you need to keep your choux chilled, I recommend doing the “dipping” step at the last moment.

Gallery